仕事で下にメニュータブがあり、さらに上にもタブがあるようなレイアウトを作成したので、作り方をメモします。
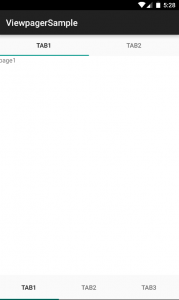
仕事で作ったのはこんな画面です。

下がメニューとなっていて、コンテンツ画面もスワイプできるようになっています。
まず、下タブレイアウトから作ります。
下タブのレイアウトを作る
Activity1個フラグメント複数という構成で作成します。
まずはmainActivityから
|
1 2 3 4 5 6 7 8 9 10 11 12 13 14 15 16 17 18 19 20 21 22 23 24 25 26 27 28 29 30 31 32 33 34 35 36 37 38 39 40 41 42 43 44 |
package com.example.jiji30000.viewpagersample; import android.support.v4.app.FragmentTabHost; import android.support.v7.app.AppCompatActivity; import android.os.Bundle; import android.util.Log; import android.widget.TabHost; public class MainActivity extends AppCompatActivity implements FragmentTabHost.OnTabChangeListener{ private static final String TAG = MainActivity.class.getName(); @Override protected void onCreate(Bundle savedInstanceState) { Log.d(TAG, "onCreate"); super.onCreate(savedInstanceState); setContentView(R.layout.activity_main); // FragmentTabHostを取得する FragmentTabHost tabHost = (FragmentTabHost)findViewById(android.R.id.tabhost); tabHost.setup(this, getSupportFragmentManager(), R.id.container); TabHost.TabSpec tabSpec1, tabSpec2, tabSpec3; // タブ生成1 tabSpec1 = tabHost.newTabSpec("tab1"); tabSpec1.setIndicator("tab1"); tabHost.addTab(tabSpec1, PageFragment.class, null); // タブ生成2 tabSpec2 = tabHost.newTabSpec("tab2"); tabSpec2.setIndicator("tab2"); tabHost.addTab(tabSpec2, PageFragment2.class, null); // タブ生成3 tabSpec3 = tabHost.newTabSpec("tab3"); tabSpec3.setIndicator("tab3"); tabHost.addTab(tabSpec3, PageFragment3.class, null); // リスナー登録 tabHost.setOnTabChangedListener(this); } @Override public void onTabChanged(String tabId) { } } |
タブを生成するのに、FragmentTabHostを使用しています。
タブの大元みたい。
その大元に対して、TabSpecと呼ばれる部品を突っ込んでいます。
|
1 2 3 4 5 6 7 8 |
// FragmentTabHostを取得する FragmentTabHost tabHost = (FragmentTabHost)findViewById(android.R.id.tabhost); tabHost.setup(this, getSupportFragmentManager(), R.id.container); TabHost.TabSpec tabSpec1, tabSpec2, tabSpec3; // タブ生成1 tabSpec1 = tabHost.newTabSpec("tab1"); tabSpec1.setIndicator("tab1"); tabHost.addTab(tabSpec1, PageFragment.class, null); |
突っ込むフラグメントのViewがそのまま表示されるわけですね。
続いて、大事なxmlを見ます。
|
1 2 3 4 5 6 7 8 9 10 11 12 13 14 15 16 17 18 19 20 21 22 23 24 25 26 27 28 29 30 31 |
<android.support.v4.app.FragmentTabHost xmlns:android="http://schemas.android.com/apk/res/android" android:id="@android:id/tabhost" android:layout_width="match_parent" android:layout_height="match_parent"> <RelativeLayout android:layout_width="match_parent" android:layout_height="match_parent" android:orientation="vertical"> <!-- tab部分 --> <TabWidget android:id="@android:id/tabs" android:layout_width="match_parent" android:layout_height="wrap_content" android:layout_alignParentBottom="true" android:orientation="horizontal" /> <!-- contents --> <FrameLayout android:id="@android:id/tabcontent" android:layout_width="0dp" android:layout_height="0dp" android:layout_above="@android:id/tabs" /> <!-- contents --> <FrameLayout android:id="@+id/container" android:layout_width="match_parent" android:layout_height="match_parent" android:layout_above="@android:id/tabs" /> </RelativeLayout> </android.support.v4.app.FragmentTabHost> |
タブを下にもってくるために、Tabwidgetにlayout_align_ParentBottom=”true”を
id:tabcontentとcontainerにlayout_aboveを入れています。
もちろん中身であるcontainerのlayout_height=”match_parent”を入れています。
これで、下タブレイアウトの完成です。
タブにセットするFragmentには、TextViewをセットしています。
上にタブのある画面を作る
次は、上タブを作ります。ViewPagerを使います。
上タブの対象となるのは、一番左にセットしたPageFragmentです。
PageFragmentにViewPagerをセットします。
|
1 2 3 4 5 6 7 8 9 10 11 12 13 14 15 16 17 18 19 20 21 22 23 24 25 26 27 28 29 30 31 32 33 34 |
package com.example.jiji30000.viewpagersample; import android.os.Bundle; import android.support.design.widget.TabLayout; import android.support.v4.app.Fragment; import android.support.v4.view.ViewPager; import android.util.Log; import android.view.LayoutInflater; import android.view.View; import android.view.ViewGroup; public class PageFragment extends Fragment { private static final String TAG = PageFragment.class.getName(); // スライド用の部品 private ViewPager mPager; @Override public void onCreate(Bundle savedInstanceState) { super.onCreate(savedInstanceState); } @Override public View onCreateView(LayoutInflater inflater, ViewGroup container, Bundle savedInstanceState) { Log.d(TAG, "onCreateView"); View view = inflater.inflate(R.layout.viewpager_fragment, container, false); mPager = (ViewPager)view.findViewById(R.id.viewpager); mPager.setAdapter(new SampleFragmentPagerAdapter(getChildFragmentManager(), getContext())); // 上部にタブをセットする TabLayout tabLayout = (TabLayout) view.findViewById(R.id.tabs); tabLayout.setupWithViewPager(mPager); return view; } } |
TabLayoutを使って、ViewPagerをタブっぽくしたのは、前やったんですが、
前と違うのはこの部分です。
|
1 2 |
mPager.setAdapter(new SampleFragmentPagerAdapter(getChildFragmentManager(), getContext())); |
FragmentMangerでなく、ChildFragmentMangerを利用します。
セットする子のFragmentに対して作用する必要があるので、当然か
では、PageFragmentのxmlを見ます。
|
1 2 3 4 5 6 7 8 9 10 11 12 13 14 15 16 17 18 19 20 |
<LinearLayout xmlns:android="http://schemas.android.com/apk/res/android" android:layout_width="match_parent" android:layout_height="match_parent" xmlns:app="http://schemas.android.com/apk/res-auto" xmlns:tools="http://schemas.android.com/tools" tools:context="com.example.jiji30000.viewpagersample.FragmentPage" android:orientation="vertical"> <android.support.design.widget.TabLayout android:id="@+id/tabs" android:layout_width="match_parent" android:layout_height="wrap_content" /> <android.support.v4.view.ViewPager android:id="@+id/viewpager" android:layout_width="match_parent" android:layout_height="wrap_content" android:background="@android:color/white" /> </LinearLayout> |
前と変わりないですね。
最後は、対象AdapterのSampleFragmentPagerAdapterです。
|
1 2 3 4 5 6 7 8 9 10 11 12 13 14 15 16 17 18 19 20 21 22 23 24 25 26 27 28 29 30 31 32 33 34 35 36 37 38 39 40 |
package com.example.jiji30000.viewpagersample; import android.content.Context; import android.support.v4.app.Fragment; import android.support.v4.app.FragmentManager; import android.support.v4.app.FragmentPagerAdapter; public class SampleFragmentPagerAdapter extends FragmentPagerAdapter { final int PAGE_COUNT = 2; private String tabTitles[] = new String[]{"Tab1", "Tab2"}; private Context context; public SampleFragmentPagerAdapter(FragmentManager fm, Context context) { super(fm); this.context = context; } @Override public int getCount() { return PAGE_COUNT; } @Override public Fragment getItem(int position) { // fragmentを切り替える switch(position){ case 0: return new ContentFragment1(); case 1: return new ContentFragment2(); } return null; } @Override public CharSequence getPageTitle(int position) { // Generate title based on item position return tabTitles[position]; } } |
これで、レイアウト自体は終了です。
タブを使用した際のライフサイクルはどうなっているのか?
プログラマとして気になることは、ライフサイクルがどうなっているかです。
もし、自分の予期した挙動と違ったら、重大なバグが起き、いろんな意味で死にます。
気になる挙動をログで見ましょう。
まずは、初期画面一番上にはっつけた画像の状態のログです。
05-29 06:22:02.371 19442-19442/com.example.jiji30000.viewpagersample D/com.example.jiji30000.viewpagersample.MainActivity﹕ onCreate
05-29 06:22:02.399 19442-19442/com.example.jiji30000.viewpagersample D/com.example.jiji30000.viewpagersample.PageFragment﹕ onCreateView
05-29 06:22:02.405 19442-19442/com.example.jiji30000.viewpagersample D/com.example.jiji30000.viewpagersample.ContentFragment1﹕ onCreateView
05-29 06:22:02.406 19442-19442/com.example.jiji30000.viewpagersample D/com.example.jiji30000.viewpagersample.ContentFragment1﹕ onResume
05-29 06:22:02.406 19442-19442/com.example.jiji30000.viewpagersample D/com.example.jiji30000.viewpagersample.ContentFragment2﹕ onCreateView
ViewPagerのコンテンツとなるFragment2つともonCreateViewが呼ばれています。ViewPagerは画面となっている画面の左右も生成されるので、当たり前か
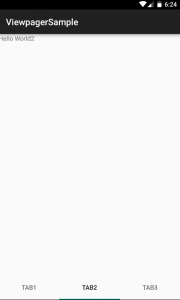
では、タブを移った時は、どうなるでしょうか?

ログはこうなります。
05-29 06:24:39.996 19442-19442/com.example.jiji30000.viewpagersample D/com.example.jiji30000.viewpagersample.ContentFragment1﹕ onStop
05-29 06:24:39.996 19442-19442/com.example.jiji30000.viewpagersample D/com.example.jiji30000.viewpagersample.ContentFragment2﹕ onStop
05-29 06:24:39.998 19442-19442/com.example.jiji30000.viewpagersample D/com.example.jiji30000.viewpagersample.PageFragment2﹕ onCreateView
ContentFragmentにはonStopとonDetachにLogを仕込んでいますが、
画面が破棄された時に呼ばれるonDetachは呼ばれていません。
つまり、メモリ上に残っていることになります。
一つのActivityに対して、これらの複数のFragmentをセットしているからだと理解しました。当たり前だけど、
codemore code
~~~~