AndroidのNavigationViewを導入する方法です。
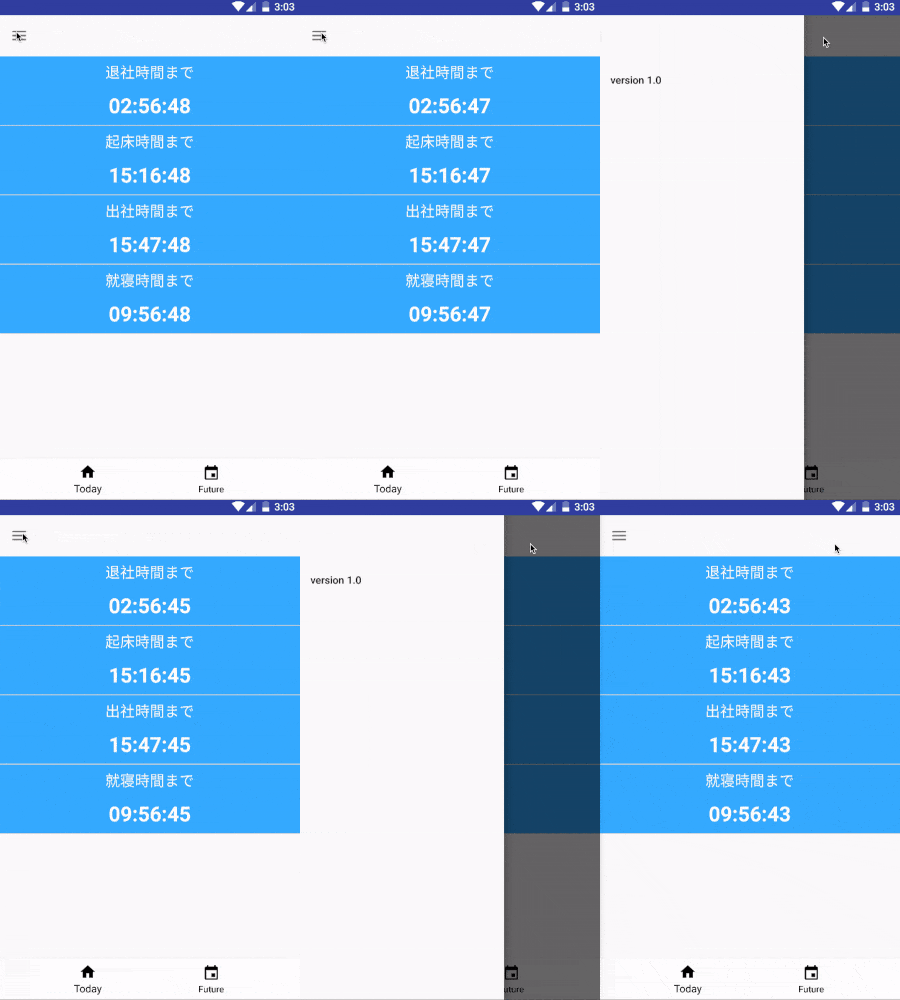
UIの動きとしては、google play(2017/5/4現在)で見られるようなこんなUIのことです。

今回は、BottomNavigationViewとtoolbarも導入しています。
まずは、BottomNavigationViewを定義したxmlファイルを見ます。
|
1 2 3 4 5 6 7 8 9 10 11 12 13 14 15 16 17 18 19 20 21 22 23 24 25 26 27 28 29 30 31 32 33 34 35 36 37 38 39 40 41 42 43 44 45 46 47 48 49 50 51 52 53 54 55 |
<!-- data binding --> <layout xmlns:android="http://schemas.android.com/apk/res/android" xmlns:app="http://schemas.android.com/apk/res-auto" xmlns:tools="http://schemas.android.com/tools"> <!-- DrawerLayout --> <android.support.v4.widget.DrawerLayout android:id="@+id/drawer_layout" android:layout_width="match_parent" android:layout_height="match_parent" android:fitsSystemWindows="true"> <RelativeLayout android:id="@+id/activity_main" android:layout_width="match_parent" android:layout_height="match_parent"> <!-- tool bar --> <android.support.v7.widget.Toolbar android:id="@+id/toolbar" android:layout_width="match_parent" android:layout_height="wrap_content" android:minHeight="?attr/actionBarSize"></android.support.v7.widget.Toolbar> <android.support.design.widget.BottomNavigationView android:id="@+id/bottom_navigation" android:layout_width="match_parent" android:layout_height="wrap_content" android:layout_alignParentBottom="true" android:background="@android:color/white" app:itemIconTint="@android:color/black" app:itemTextColor="@android:color/black" app:menu="@menu/bottom_navigation_main" /> <!-- contents --> <FrameLayout android:id="@+id/container" android:layout_width="match_parent" android:layout_height="match_parent" android:layout_above="@id/bottom_navigation" android:layout_below="@id/toolbar"></FrameLayout> </RelativeLayout> <!-- NavigationView --> <android.support.design.widget.NavigationView android:id="@+id/navigation_view" android:layout_width="wrap_content" android:layout_height="match_parent" android:layout_gravity="start" android:fitsSystemWindows="true" app:headerLayout="@layout/nav_header_main" app:menu="@menu/activity_main_drawer" /> </android.support.v4.widget.DrawerLayout> </layout> |
NavigationViewをレイアウトファイルに定義する際は、少し特殊な書き方になります。
今回は、xmlファイルにdatabindingも導入しているので、xmlファイルの一番上に<layout>タグを記入しています。
その次に<DrawerLayout>タグを定義し、FrameLayoutのContents領域、最後に<NavigationView>を挿入しています。
<NavigationView>タグに
app:headerLayout=”@layout/nav_header_main”
app:menu=”@menu/activity_main_drawer”
を定義しています。
これらは、ぞれぞれheaderのレイアウトファイルを定義する。
menuのレイアウトファイルを定義する意味になります。
これらは、もちろんプログラム上からも作成できますが、今回はxmlファイルから生成します。
では、NavigationViewのheaderの参照xmlファイルを見ていきます。
|
1 2 3 4 5 6 7 8 9 10 11 12 13 14 15 |
<?xml version="1.0" encoding="utf-8"?> <RelativeLayout xmlns:android="http://schemas.android.com/apk/res/android" android:layout_width="match_parent" android:layout_height="80dp" android:background="@android:color/white" > <ImageView android:layout_width="wrap_content" android:layout_height="wrap_content" android:src="@drawable/navigation_header" android:id="@+id/username" android:layout_marginLeft="2dp" /> </RelativeLayout> |
NavigationViewのheaderのレイアウトファイルnav_header_main.xmlの中身です。
中身として、ImageViewをセットしています。
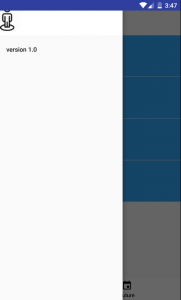
headerのimageは以下のようになります。

画像は、android6.0で実行したものですが、見てわかるように、navigation headerのheightの開始位置がステータスバー始点になっているため、ImageViewで設定したアイコンがステータスバーにかぶってしまっています。
androidのversionによってthemeが異なるために、NavigationViewのY座標の開始点が異なります。
なので、versionごとにStylesの設定をわけるなどの分岐処理が必要になります。
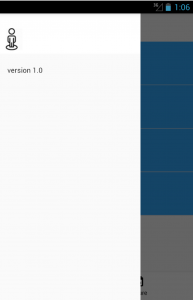
例えば、androidの4.1.1で実行した場合は、以下のようになります。

この場合は、ステータスバーとアイコンがかぶっていません。
このように表示が異なるためandroidのversionごとに対応する必要があります。
続いて、表示させるmenuを見ていきます。
NavigationViewのmenu設定
|
1 2 3 4 5 6 7 8 9 10 11 12 13 14 15 16 17 18 19 20 21 22 |
<?xml version="1.0" encoding="utf-8"?> <menu xmlns:android="http://schemas.android.com/apk/res/android"> <group> <item android:id="@+id/nav_version" android:title="Import" /> <item android:id="@+id/nav_gallery" android:icon="@android:drawable/ic_menu_gallery" android:title="Gallery" /> <item android:id="@+id/nav_slideshow" android:icon="@android:drawable/ic_menu_slideshow" android:title="Slideshow" /> <item android:id="@+id/nav_manage" android:icon="@android:drawable/ic_menu_manage" android:title="Tools" /> </group> </menu> |
iconとタイトルのみを設定した単純なレイアウトです。
続いて、プログラム側を見ていきます。
NavigationMenuプログラム側の実装
設定するActivityのonCreateなどで、以下のように設定します。
|
1 2 3 4 5 6 7 8 9 10 11 12 13 14 15 16 17 18 19 20 21 22 23 24 25 26 27 28 29 30 31 32 33 34 35 36 |
public class MainActivity extends AppCompatActivity implements NavigationView.OnNavigationItemSelectedListener { // navigation menuの出し入れを管理するobject private ActionBarDrawerToggle drawerToggle; @Override protected void onCreate(Bundle savedInstanceState) { // 初期化処理など.. // drawer設定(1) drawerToggle = new ActionBarDrawerToggle( this, bind.drawerLayout, bind.toolbar, R.string.app_name, R.string.app_name ) { // drawerが閉じられた時に呼ばれる public void onDrawerClosed(View view) { // navigation view更新 invalidateOptionsMenu(); } // drawerが開かれた時に呼ばれる public void onDrawerOpened(View drawerView) { // navigation view更新 invalidateOptionsMenu(); } }; // drawerLayoutに先ほど設定したリスナーを設定 drawerLayout.addDrawerListener(drawerToggle); // drawerのアイコンなどの描画処理の設定などを行う drawerToggle.syncState(); // navigationViewのmenuのタップリスナー navigationView.setNavigationItemSelectedListener(this); } } |
(1)でDrawerの設定をしています。
コンストラクタでは、連携させるActivityやtoolbarのインスタンスなどを渡しています。
そのまま、関数に飛ぶとjavadogに説明が書かれています。
続いて、NavigationViewをタップした際の処理を見ていきます。
|
1 2 3 4 5 6 7 8 9 10 11 12 13 14 |
@Override public boolean onNavigationItemSelected(@NonNull MenuItem item) { switch(item.getItemId()){ case R.id.nav_version: break; case R.id.nav_gallery: break; case R.id.nav_slideshow: break; case R.id.nav_manage: break; } return true; } |
ActivityにNavigationView.OnNavigationItemSelectedListenerをimplementし、
onCreate上で、リスナーの設定をしています。
中身は単純で、xmlで設定したidで分岐し、タップされた際の処理をしているだけです。
codemore code
~~~~