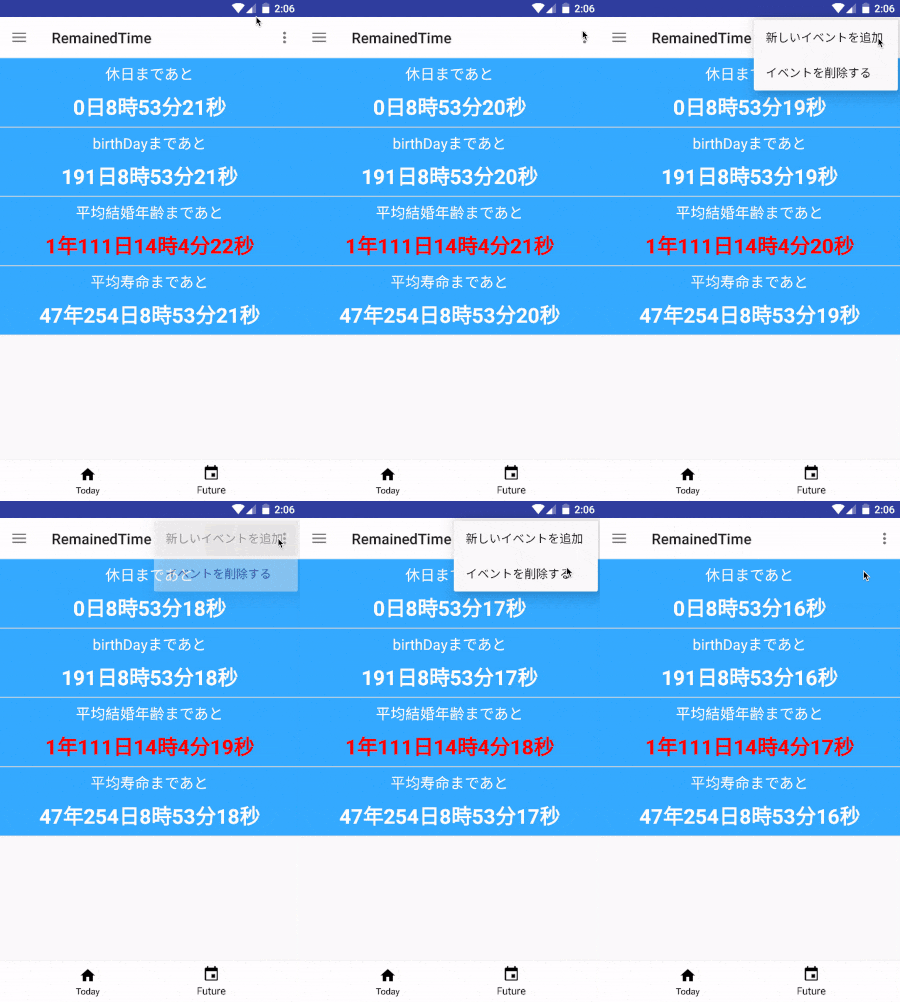
Activityにmenuを追加する方法です。
menuはtoolbar上にある下のようなuiのことです。

画像では、ActivityにBottomNavigationをUIとして保持しており、
表示にはFragmentを使用しています。
Menuを表示するために必要なToolbarはActivityのレイアウトxmlに保持しているので、
Activityの実装から見ていきます。
ActivityにMenuを追加する
まずは、activityのxmlから
|
1 2 3 4 5 6 7 8 9 10 11 12 13 14 15 16 17 18 19 20 21 22 23 24 25 26 27 28 29 30 31 32 33 34 35 36 37 38 39 40 41 42 43 44 45 46 47 48 49 50 51 52 53 |
<layout xmlns:android="http://schemas.android.com/apk/res/android" xmlns:app="http://schemas.android.com/apk/res-auto" xmlns:tools="http://schemas.android.com/tools"> <android.support.v4.widget.DrawerLayout android:id="@+id/drawer_layout" android:layout_width="match_parent" android:layout_height="match_parent" android:fitsSystemWindows="true"> <RelativeLayout android:id="@+id/activity_main" android:layout_width="match_parent" android:layout_height="match_parent"> <!-- tool bar --> <android.support.v7.widget.Toolbar android:id="@+id/toolbar" android:layout_width="match_parent" android:layout_height="wrap_content" android:background="@android:color/white" android:minHeight="?attr/actionBarSize" android:titleTextColor="@android:color/black"></android.support.v7.widget.Toolbar> <android.support.design.widget.BottomNavigationView android:id="@+id/bottom_navigation" android:layout_width="match_parent" android:layout_height="wrap_content" android:layout_alignParentBottom="true" android:background="@android:color/white" app:itemIconTint="@android:color/black" app:itemTextColor="@android:color/black" app:menu="@menu/bottom_navigation_main" /> <FrameLayout android:id="@+id/container" android:layout_width="match_parent" android:layout_height="match_parent" android:layout_above="@id/bottom_navigation" android:layout_below="@id/toolbar"></FrameLayout> </RelativeLayout> <android.support.design.widget.NavigationView android:id="@+id/navigation_view" android:layout_width="wrap_content" android:layout_height="match_parent" android:layout_gravity="start" android:fitsSystemWindows="true" app:headerLayout="@layout/nav_header_main" app:menu="@menu/activity_main_drawer" /> </android.support.v4.widget.DrawerLayout> </layout> |
注目すべきなのは、
android.support.v7.widget.toolbar
です。
MenuはToolbarのUIの一つなので、Toolbarを定義する必要があります。
また、DesginSupportLibraryでtoolbarが用意されており、今回はそちらを使っているため、
gradleファイルに記載しなければいけません。
対象バージョンは、version 24.2.0です。
続いて、Acitvityのソースを見ていきます。
|
1 2 3 4 5 6 7 8 |
@Override protected void onCreate(Bundle savedInstanceState) { // .... super.onCreate(savedInstanceState); // toolbar Toolbar toolbar = (Toolbar)view.findById(R.id.toolbar); setSupportActionBar(toolbar); } |
Toolbarをインスタンス化し、supportActionbarにセットしているだけです。今回は、Fragment常にMenuを出現させるので、Menuの表示等の処理はFragmentで行います。
FragmentにMenuを表示する
|
1 2 3 4 5 6 7 8 9 10 11 12 13 14 15 16 17 18 19 20 21 22 23 24 25 26 27 28 |
@Override public View onCreateView(LayoutInflater inflater, ViewGroup container, Bundle savedInstanceState) { // メニューオプションを表示させる setHasOptionsMenu(true); } @Override public void onCreateOptionsMenu(Menu menu, MenuInflater inflater) { // xmlを指定して、レイアウトを管理する inflater.inflate(R.menu.menu_future, menu); super.onCreateOptionsMenu(menu,inflater); } @Override public boolean onOptionsItemSelected(MenuItem item) { // Menuがタップされた際の挙動 int id = item.getItemId(); switch (id){ case R.id.add_future_event: // 新しいイベントを追加 break; case R.id.erase_future_event: // イベントを消去 break; } return super.onOptionsItemSelected(item); } |
まず、メニューのxmlを定義します。
Overrideメソッドの
onCreateOptionMenu
ないで、使用するレイアウトファイルを指定してください。
続いて、メニューがタップされた際に呼ばれる
onOptionsItemSelected
です。
MenuItemのidによって、タップ処理の場合分けをしているのみになります。
最後にmenuのレイアウトとなるxmlを見ます。
OptionMenuのレイアウトxmlファイル
|
1 2 3 4 5 6 7 8 9 10 11 12 13 14 |
<menu xmlns:android="http://schemas.android.com/apk/res/android" xmlns:app="http://schemas.android.com/apk/res-auto" > <item android:id="@+id/add_future_event" android:orderInCategory="1" android:title="@string/add_future_event" app:showAsAction="never" /> <item android:id="@+id/erase_future_event" android:orderInCategory="2" android:title="@string/erase_future_event" app:showAsAction="never" /> </menu> |
itemの内に記載した属性を見ていきます。
android:showAsActionKeyword. When and how this item should appear as an action item in the app bar. A menu item can appear as an action item only when the activity includes an app bar. Valid values:
| Value | Description |
|---|---|
ifRoom |
Only place this item in the app bar if there is room for it. If there is not room for all the items marked "ifRoom", the items with the lowest orderInCategory values are displayed as actions, and the remaining items are displayed in the overflow menu. |
withText |
Also include the title text (defined by android:title) with the action item. You can include this value along with one of the others as a flag set, by separating them with a pipe |. |
never |
Never place this item in the app bar. Instead, list the item in the app bar’s overflow menu. |
always |
Always place this item in the app bar. Avoid using this unless it’s critical that the item always appear in the action bar. Setting multiple items to always appear as action items can result in them overlapping with other UI in the app bar. |
collapseActionView |
The action view associated with this action item (as declared by android:actionLayout orandroid:actionViewClass) is collapsible.Introduced in API Level 14. |
See the Adding the App Bar training class for more information.
Introduced in API Level 11.
・orderInCategory
メニューの並び順。
昇順に並びます。
codemore code
~~~~